
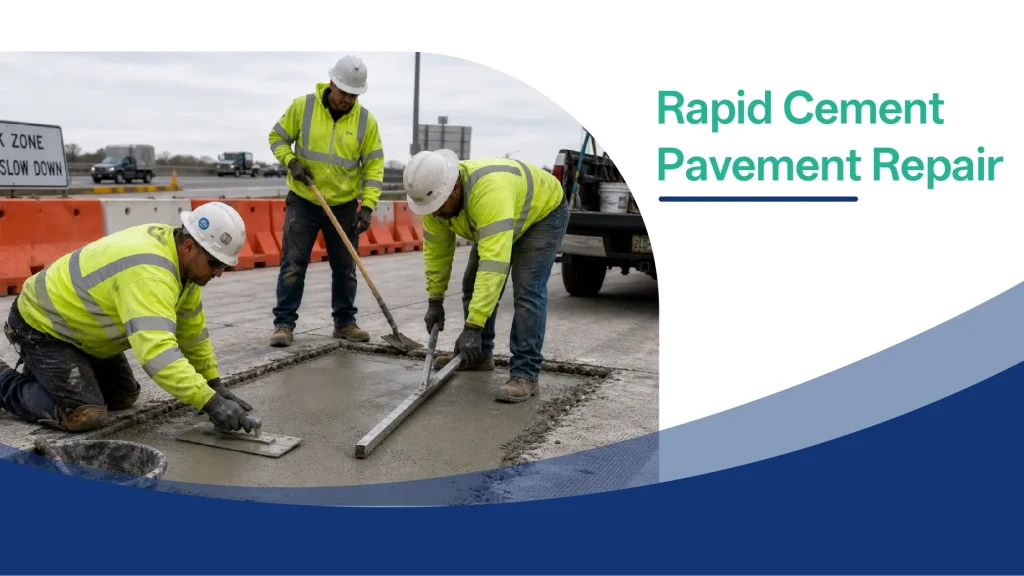
To use rapid-setting cement pavement repair mortar, workers must remove all unsound concrete, roughen smooth areas, wash away dust, and saturate the substrate without leaving standing water. They must then mix the powder with the specified amount of clean water, place it quickly, finish it with minimal trowel passes, and protect it with proper curing.
Every step affects the final result. A high-quality repair mortar can still fail when workers place it over dust, add too much water, or open the road before the patch develops enough strength.
Under warm conditions above 20°C, some rapid repair systems may allow traffic after two to three hours. However, the actual opening time depends on the product, pavement temperature, repair depth, traffic load, and early strength.
What Is Rapid-Setting Cement Pavement Repair Mortar?
Rapid-setting cement pavement repair mortar is a factory-produced dry mix for repairing damaged concrete roads and other horizontal concrete surfaces.
The user normally needs to add only clean water. The material then develops workability for placement and high early strength for a short road closure.
Common ingredients include:
- Rapid-hardening cement
- Portland cement or blended cement
- Graded mineral aggregate
- Early-strength additives
- Water-reducing agents
- Polymer powder
- Cellulose ether
- Defoamer
- Shrinkage-control components
- Fibers or other durability additives
The exact composition depends on the required setting time, strength, repair thickness, climate, and traffic load.
A well-designed rapid concrete repair mortar should provide more than fast setting. It should also provide good adhesion, controlled shrinkage, suitable workability, impact resistance, and long-term durability.
Where Can Rapid Pavement Repair Mortar Be Used?
Rapid-setting cement pavement repair mortar is suitable for local damage where the remaining concrete provides a stable substrate.
Typical applications include:
- Concrete road potholes
- Surface spalling
- Peeling pavement
- Pitted concrete surfaces
- Local hollow or delaminated areas
- Bridge deck repairs
- Parking garage floors
- Loading docks
- Factory floors
- Concrete ramps
- Pavement edges
- Areas around concrete joints
- Municipal road maintenance
The material can reduce road closure time when a conventional mortar would need a much longer curing period.
However, repair mortar cannot solve every pavement problem.
A qualified engineer should investigate the area when the pavement has active structural cracks, serious settlement, slab pumping, failed foundations, moving joints, widespread reinforcement corrosion, or full-depth structural damage. A thin surface patch will not correct movement below the concrete.
Tools and Equipment
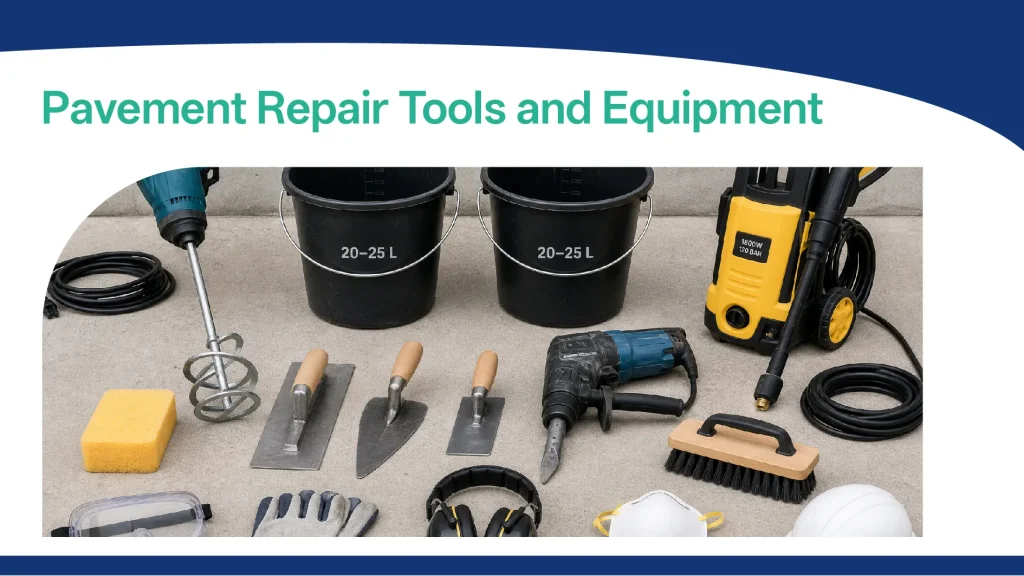
Workers should prepare all equipment before opening the repair mortar bag. Rapid-setting materials provide a shorter working time than conventional mortar.
| Tool or Equipment | Main Function |
|---|---|
| Handheld mortar mixer | Produces a uniform small batch |
| Automatic mortar mixer | Supports large repair areas |
| Two or more 20–25 L buckets | Allows continuous mixing and clean water measurement |
| High-pressure washer | Removes dust and weak residue |
| Sponge or mop | Removes standing water |
| Trowels | Places and finishes the mortar |
| Chipping hammer or scarifier | Removes weak concrete and roughens smooth surfaces |
| Stiff brush | Cleans edges and corners |
| Water-measuring container | Controls the water-to-powder ratio |
| Traffic barriers | Protects workers and the fresh repair |
| Gloves, eye protection, mask, and safety footwear | Protects the repair team |
The team should also keep clean water, curing covers, and backup mixing tools near the work area. Delays during mixing or placement can cause rapid repair mortar to harden before finishing.
Pavement Repair Process at a Glance
| Step | Main Requirement |
|---|---|
| 1. Inspect | Define the complete damaged area |
| 2. Remove | Eliminate loose, hollow, and peeling concrete |
| 3. Roughen | Create a firm mechanical key |
| 4. Clean | Remove dust, mud, oil, and debris |
| 5. Pre-wet | Saturate the concrete without leaving standing water |
| 6. Mix | Add powder to measured water and mix uniformly |
| 7. Place | Apply the mortar within its working time |
| 8. Finish | Level with minimal trowel passes |
| 9. Cure | Protect the repair from rapid moisture loss |
| 10. Reopen | Confirm adequate strength before traffic loading |
Step 1: Inspect and Mark the Repair Area
Workers should first identify the complete damaged area. Visible peeling may extend beyond the concrete that has already separated.
The inspector should look for:
- Hollow sounds under light tapping
- Loose concrete
- Cracks
- Scaling
- Oil contamination
- Weak edges
- Reinforcement exposure
- Moisture movement
- Signs of slab settlement
The repair boundary should extend into solid concrete. A repair that stops over weak material can soon separate around its edge.
The team must also establish traffic control before mechanical preparation begins. Dust, flying particles, water, and equipment can create hazards for workers and road users.
Step 2: Remove Loose and Damaged Concrete
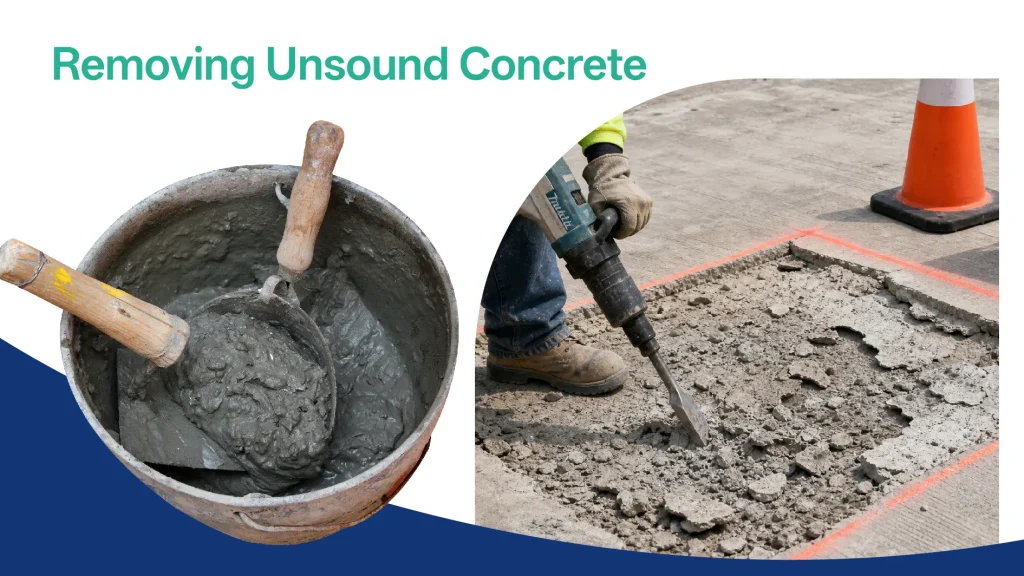
Workers must remove all bulging, peeling, hollow, cracked, and loose material.
A light chipping hammer, scarifier, or suitable hand tool can be used. The tool should remove weak concrete without causing unnecessary microcracking in the sound substrate.
The finished repair area should have firm edges and a stable base. Workers should not place new mortar over material that moves, powders, or breaks away under light pressure.
Weak substrate removal is one of the most important parts of pavement repair. Repair mortar bonds to the surface below it. If that surface separates, the new patch will separate with it.
Step 3: Roughen Shallow or Smooth Areas
Workers should roughen areas that are very shallow, excessively smooth, or contaminated by oil.
Areas with a depth below approximately 3 mm require particular attention. A feather-edge repair may not provide enough thickness for reliable performance unless the repair product is specifically designed for feather-edge application.
The repair team can use a scarifier or electric chipping hammer to create a rough, open surface. The roughness increases the contact area and provides a mechanical key for the new mortar.
Workers should also remove oil rather than simply roughening over it. Oil can penetrate concrete and prevent cement-based materials from bonding. Heavily contaminated concrete may need deeper removal or a specialized cleaning process.
The repair depth must remain within the minimum and maximum limits stated for the selected mortar.
Step 4: Clean the Substrate Thoroughly
Workers should remove all loose dust and debris after chipping and roughening.
A high-pressure washer can clean the repair area and expose remaining weak particles. The team must direct mud and wastewater out of the work area. Dirty water must not flow back into the prepared repair.
The final surface should contain no:
- Loose dust
- Cement slurry
- Mud
- Oil
- Paint
- Curing compound
- Weak laitance
- Organic material
- Standing debris
The edges and corners need special attention. Dust often remains in these locations even when the main surface looks clean.
A repair mortar that bonds to dust does not bond to concrete.
Step 5: Pre-Wet the Concrete
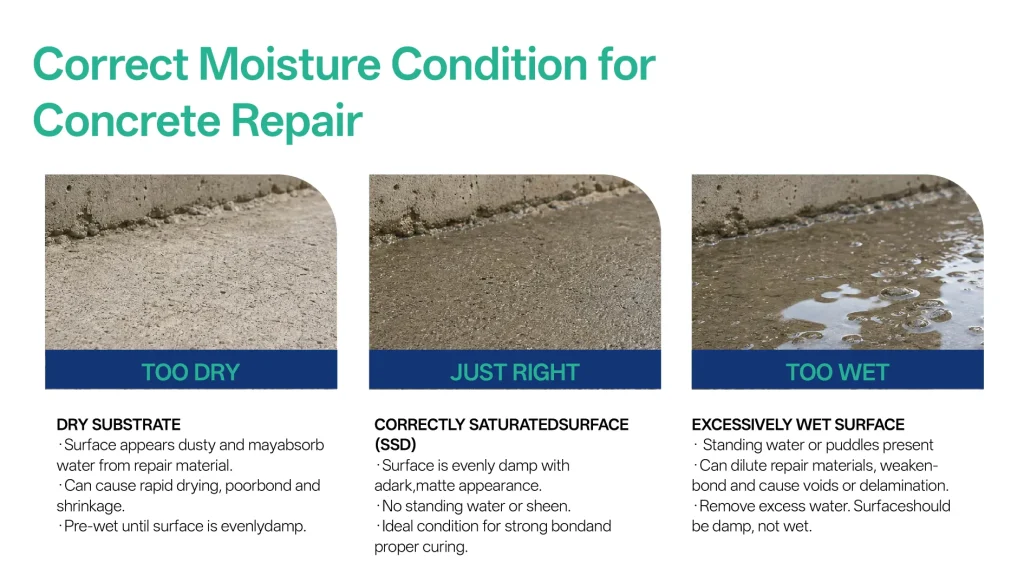
The existing concrete can absorb water from fresh repair mortar. Rapid water loss can reduce workability and interfere with cement hydration at the bond line.
Workers should therefore pre-wet the prepared area with clean water. The water should remain on the surface long enough to saturate the concrete.
Small air bubbles may rise from the pores during pre-wetting. The substrate is close to saturation when the bubbling stops and the surface no longer absorbs water quickly.
Before placement, workers must remove all puddles. A sponge, mop, or clean absorbent cloth can remove water from low areas.
The correct condition is often described as saturated surface dry:
- The concrete is fully damp.
- The concrete does not pull water rapidly from the mortar.
- The surface does not contain free water or puddles.
A dry substrate can reduce bond quality. Standing water can dilute the mortar at the interface and create a weak layer. Both conditions can cause premature failure.
Step 6: Measure the Mixing Water
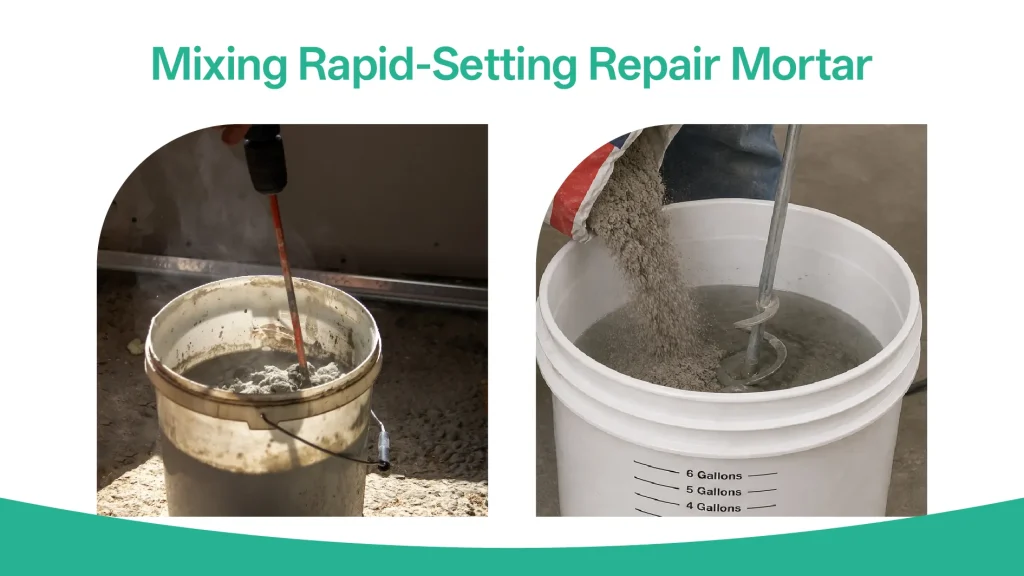
The mixing water must be measured accurately.
A reference water addition for this type of rapid repair mortar is approximately 20% of the dry powder weight. The product’s confirmed water ratio must always take priority.
| Dry Mortar Weight | Approximate Water at 20% |
|---|---|
| 10 kg | 2.0 kg or about 2.0 L |
| 20 kg | 4.0 kg or about 4.0 L |
| 25 kg | 5.0 kg or about 5.0 L |
| 40 kg | 8.0 kg or about 8.0 L |
Workers must not add extra water simply because the mortar begins to stiffen.
Excess water can cause:
- Lower early strength
- Higher shrinkage
- Surface dusting
- Segregation
- Longer hardening time
- Reduced abrasion resistance
- Lower bond strength
- Shorter repair life
The team should use cool, clean water and a calibrated measuring container. The water temperature can affect working time, especially in hot weather.
Step 7: Mix the Repair Mortar
Workers should pour the measured water into the clean mixing bucket first. They should then add the repair mortar powder while the mixer is running.
This order helps wet the powder evenly and reduces dry material at the bottom of the bucket.
The worker should move the handheld mixer through the complete batch until the mortar is uniform. The finished mix should show no dry powder, hard lumps, or visible pockets of unmixed material.
The team should mix only the amount that it can place within the product’s working time. A large batch may begin to set before workers can finish it.
Workers must never add water to mortar that has already started to harden. They must also not mix fresh material into an old, stiff batch.
For a large pavement area, an automatic mortar mixer can improve output and consistency. The team should pre-wet the mortar delivery hose before pumping. Workers should adjust the water feed and confirm a stable mortar consistency before starting placement.
Step 8: Check the Surface Again
The substrate may dry while the team mixes the mortar, especially under sunlight, wind, or high temperature.
Workers should inspect the repair area immediately before placement. They should lightly wet a surface that has become dry. They must then remove any visible water.
This final check protects the bond line and prevents the existing concrete from taking water out of the rapid-setting cement pavement repair mortar.
Step 9: Place the Mortar
Workers should place the mixed mortar directly onto the prepared surface.
They should fill low areas first and press the material into corners and edges. The placement method should avoid trapped air at the interface.
For potholes, pitted surfaces, peeling areas, and local hollow sections, workers can pour or spread the mortar over the repair area and level it with a trowel.
Workers should maintain a continuous placement operation whenever possible. Cold joints between separate batches can become weak points.
The repair mortar should remain in full contact with the prepared substrate. Workers should not scatter dry powder over the surface or add water during placement.
Step 10: Level and Finish the Surface
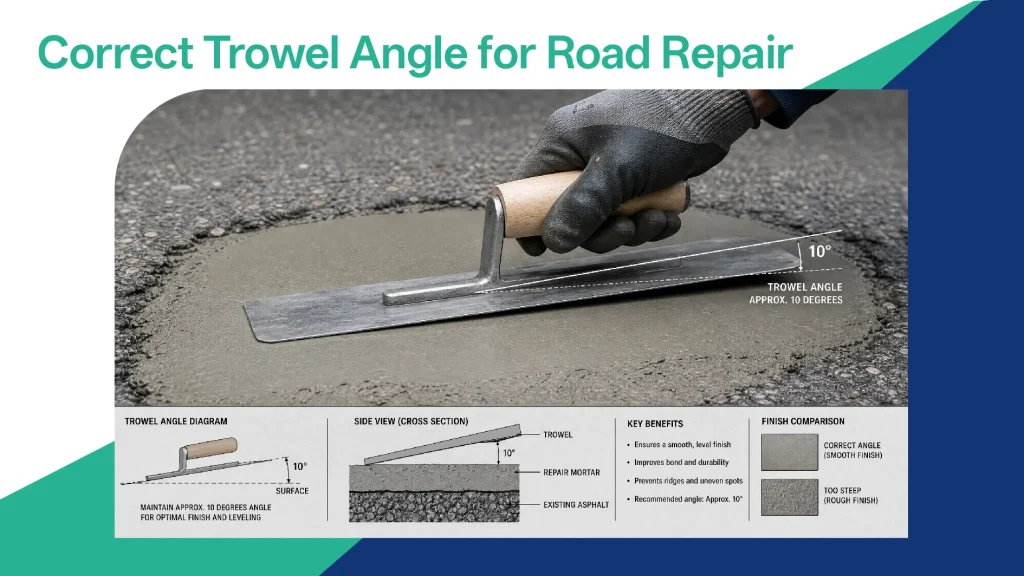
The worker can hold the leading edge of the trowel slightly above the pavement. An angle of approximately 10 degrees can help the trowel move across the fresh mortar without pulling material out of the repair.
The worker should use as few trowel passes as possible.
Repeated finishing can:
- Bring excessive paste to the surface
- Trap water below the surface
- Damage the setting structure
- Create color differences
- Reduce surface abrasion resistance
- Cause tearing or dragging
If the mortar is difficult to level immediately, the worker can stop for two to three minutes and then make a final finishing pass. This short rest may allow the material to develop enough body for a cleaner surface.
The finished patch should match the elevation, slope, and texture of the surrounding pavement. The repair must not create a bump or depression that affects drainage or vehicle movement.
Step 11: Cure and Protect the Repair
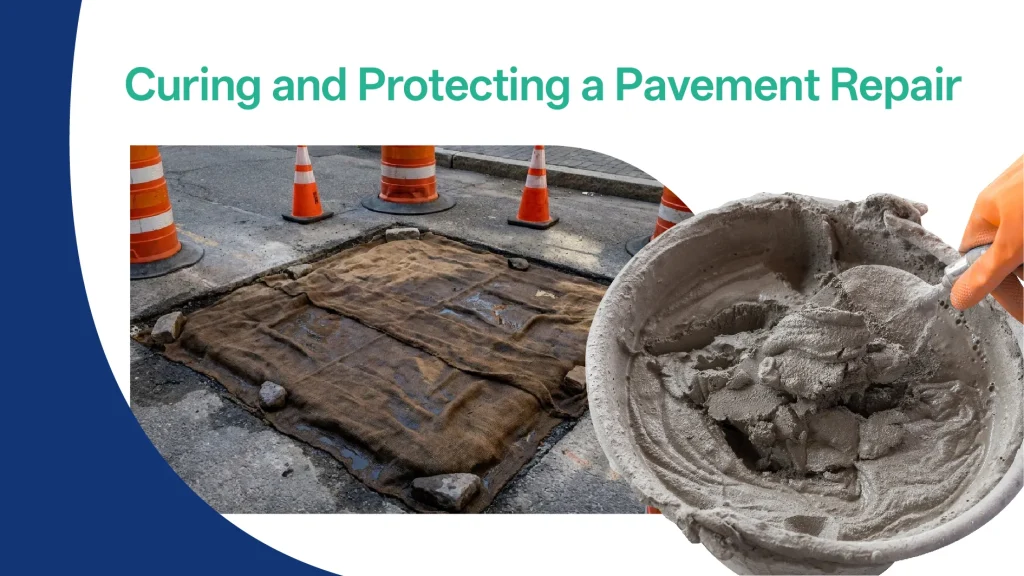
Rapid setting does not remove the need for curing.
After the surface becomes hard enough to resist damage, workers can begin gentle water curing. They must not use high-pressure water because it can wash cement paste from the new surface.
The team should use:
- Light water spray
- Damp fabric
- Wet curing mats
- Plastic film over damp material
- Insulating covers in cool weather
The surface should remain moist for at least two hours when this curing method is specified. Longer protection can improve performance when the construction schedule allows it.
Covering is especially important during hot, dry, or windy weather. These conditions can remove water quickly and increase the risk of shrinkage, surface cracking, and poor bond.
The Federal Highway Administration notes that delayed or inadequate curing can contribute to excessive shrinkage and repair delamination. It also recommends following the repair material manufacturer’s placement and curing instructions. FHWA Partial-Depth Repair Procedures
Step 12: Decide When to Open the Road
At temperatures above 20°C, a properly formulated rapid repair mortar may be ready for traffic in about two to three hours. Lower temperatures normally slow strength development and require a longer closure.
However, a clock alone cannot prove that the patch is ready.
The opening decision should consider:
- Actual pavement temperature
- Air temperature
- Repair depth
- Repair size
- Early compressive or flexural strength
- Vehicle weight
- Traffic frequency
- Edge support
- Product requirements
- Curing conditions
FHWA guidance prefers a strength-based decision for concrete pavement repairs. Rapid-setting proprietary products should follow their specified opening requirements, and test specimens can be used when confirmation is necessary. FHWA Guidance on Opening Repairs to Traffic
The team should extend the closure when the temperature is low. A longer protected period can also improve final performance when rapid reopening is not essential.
How Weather Changes the Repair Process
| Site Condition | Main Risk | Recommended Response |
|---|---|---|
| Above 20°C | Fast evaporation and short working time | Use smaller batches and protect the surface quickly |
| Hot, dry, or windy | Rapid moisture loss | Shade materials, use cool water, and cover the repair |
| Between 10°C and 20°C | Slower early strength | Extend curing and traffic closure |
| Low temperature | Delayed setting and weak early strength | Use an approved cold-weather system and verify strength |
| Rain expected | Surface damage and dilution | Protect the work area or delay application |
| Freezing conditions | Frozen water and hydration failure | Do not apply unless the product is approved for the condition |
Workers should store dry mortar away from direct sunlight and moisture. Hot powder and hot mixing water can greatly shorten the available working time.
Why Is Cellulose Ether Used in Road Repair Mortar?
Cellulose ether is a functional additive in many cement-based repair products. HPMC and HEMC can help control water retention, consistency, cohesion, and troweling behavior.
In rapid-setting cement pavement repair mortar, cellulose ether can support:
- Stable water distribution
- Better wetting of the existing concrete
- Smoother trowel application
- Lower risk of rapid surface drying
- Better cohesion
- Reduced segregation
- More consistent finishing
- Improved fresh mortar stability
The additive must be carefully selected. Excessive viscosity or dosage can make the mortar too sticky, reduce flow, stabilize unwanted air, or interfere with the required early-strength development.
Rapid repair mortar therefore needs a controlled cellulose ether system. The formulator should select the lowest effective dosage that provides the required water retention and application feel.
Which Zhiwei Cellulose Ether Grade Is Suitable?
Zhiwei (Jinan) New Materials Co., Ltd. supplies several HEMC and HPMC viscosity grades for construction materials.
Zhiwei explains that HEMC can support water retention, workability, open time, and stable handling in cement-based repair mortar. Final performance still depends on cement type, aggregate grading, polymer content, temperature, and mixing order. Zhiwei HEMC for Repair Mortar
The following models provide practical starting directions for laboratory screening.
| Repair Mortar Requirement | Zhiwei Grade Direction | Selection Note |
|---|---|---|
| Pourable road repair mortar | HEMC 4K or HPMC 4K | Supports moderate rheology control with less loss of flow |
| Trowel-applied horizontal patching mortar | HEMC 30K | A useful starting point for balanced body and workability |
| Stronger water retention or application body | HEMC 60K | Use carefully because higher viscosity can reduce flow |
| Higher-body HPMC system | HPMC 40K | Test early strength, air content, and finishing behavior |
| Vertical or high-build repair mortar | HEMC 100H or HPMC 100K | Better suited to strong body and sag resistance than highly flowable pavement mortar |
The Zhiwei HEMC range includes HEMC 400, HEMC 4K, HEMC 30K, HEMC 60K, HEMC 100H, HEMC 150H, and HEMC 200H. The Zhiwei HPMC range includes HPMC 400, HPMC 4K, HPMC 40K, HPMC 100K, HPMC 150K, and HPMC 200K.
For a trowel-applied horizontal road repair mortar, Zhiwei HEMC 30K is a reasonable first screening direction. A more fluid formula can begin with HEMC 4K or HPMC 4K.
The final model and dosage must be confirmed in the actual formula. The laboratory should evaluate working time, water retention, spread, air content, early strength, bond strength, and surface hardness.
Common Pavement Repair Mistakes
Leaving Weak Concrete in Place
The new mortar may remain attached to the weak layer, but the weak layer can separate from the pavement. Workers must continue removal until they reach sound concrete.
Placing Mortar Over Dust
Dust forms a barrier between the repair mortar and the substrate. Pressure washing and final inspection are essential.
Applying Mortar to a Dry Surface
Dry concrete pulls water from the fresh mortar. This action can weaken hydration and adhesion at the interface.
Leaving Standing Water
Puddles dilute the repair mortar and can form a weak bond layer. The substrate must remain damp without visible water.
Adding Too Much Mixing Water
Extra water may make placement easier for a few minutes, but it reduces the quality of the hardened repair.
Making Batches That Are Too Large
Rapid mortar can stiffen before the team finishes placement. Small, continuous batches provide better control.
Adding Water After the Mortar Stiffens
Re-tempering damages the designed water ratio and early-strength performance. Workers should discard material that has passed its usable time.
Overworking the Surface
Repeated troweling can weaken the top layer and create an uneven finish. Workers should use a limited number of deliberate passes.
Using High-Pressure Water for Curing
High-pressure water can remove the fresh surface paste. Workers should use gentle spraying and wet covers.
Opening the Road Only by Time
Cold weather or a deep repair may develop strength more slowly. The team should verify the product requirement and early strength before traffic loading.
Quality-Control Checklist
Before placement, the supervisor should confirm:
- The damaged concrete has been completely removed.
- The repair edges are stable.
- The surface has sufficient roughness.
- Dust, oil, mud, and slurry are absent.
- The substrate is saturated but has no standing water.
- The water quantity has been measured.
- The mixing equipment is clean.
- The batch size matches the working time.
- The repair depth is within the product limit.
- Curing covers and traffic barriers are ready.
After placement, the supervisor should confirm:
- The patch is fully filled.
- The edges contain no visible gaps.
- The surface matches the surrounding pavement.
- The patch has the required texture and slope.
- Curing begins at the correct time.
- The repair remains protected from people, vehicles, rain, and rapid drying.
- The required strength or opening condition is reached before traffic returns.
Frequently Asked Questions
How much water should be added to rapid pavement repair mortar?
A reference water addition is approximately 20% of the dry powder weight. A 25 kg bag would use about 5 kg, or approximately 5 L, of water. The confirmed product instruction must take priority.
Why should water go into the bucket before the powder?
This mixing order helps wet the powder evenly. It also reduces dry material at the bottom and sides of the bucket.
Should the concrete be wet before repair?
The concrete should be fully damp and saturated. The surface must not contain puddles or visible standing water.
Can rapid repair mortar be applied over smooth concrete?
Workers should roughen smooth concrete before application. The rough surface improves mechanical bonding.
Can workers add more water when the mortar becomes stiff?
No. Workers should not re-temper rapid-setting mortar. They should mix a fresh batch.
How long should the repair be kept moist?
The surface should remain moist for at least two hours when this curing procedure is used. Longer curing and protection can improve performance.
Can traffic return after two hours?
Some products may permit traffic after two to three hours under warm conditions. The team must verify the manufacturer’s requirement and confirm that the repair has developed adequate strength.
Which Zhiwei cellulose ether is suitable for road repair mortar?
Zhiwei HEMC 30K is a practical starting grade for trowel-applied horizontal mortar. HEMC 4K or HPMC 4K may be more suitable for a pourable system. Laboratory testing must confirm the final selection.
Conclusion
Rapid-setting cement pavement repair mortar can shorten road closures and restore damaged concrete quickly. The final durability depends on much more than fast setting.
Workers must remove weak concrete, roughen shallow areas, clean away dust, and pre-wet the substrate correctly. They must control the water ratio, mix small batches, minimize trowel passes, and begin curing as soon as the surface can accept it.
The road should reopen only after the repair develops adequate strength. Temperature, repair depth, and traffic load can change the required waiting period.
For manufacturers developing rapid road repair mortar, cellulose ether selection also deserves careful control. Zhiwei HEMC 30K offers a useful starting direction for trowel-applied horizontal repair. Zhiwei HEMC 4K or HPMC 4K can be evaluated when the formulation needs greater flow.
Zhiwei (Jinan) New Materials Co., Ltd. can recommend a focused sample plan after receiving the cement system, repair thickness, water ratio, target working time, traffic-opening requirement, and application temperature.